Frosting a cake with Basic Buttercream
Getting a smooth, perfect finish on your Buttercream cake is easier than you think. It all comes down to using the right tools, and using them the right way.
There are a host of tools available to help you frost your cake quickly, so why do I champion doing it the hard way? Because its a CRITICAL skill of cake decorating. Once you know how to do something, and do it well, not only can you take every shortcut you like, but you'll find you won't have to.
I can ice a Buttercream cake, perfectly, in 20 minutes. It just takes practice. And i'll show you how!
Tools of the Trade
There are more cake tools available than I can even comprehend, but you actually need very FEW tools to ice a cake smoothly, and I'll show you my favourites.
Turntable
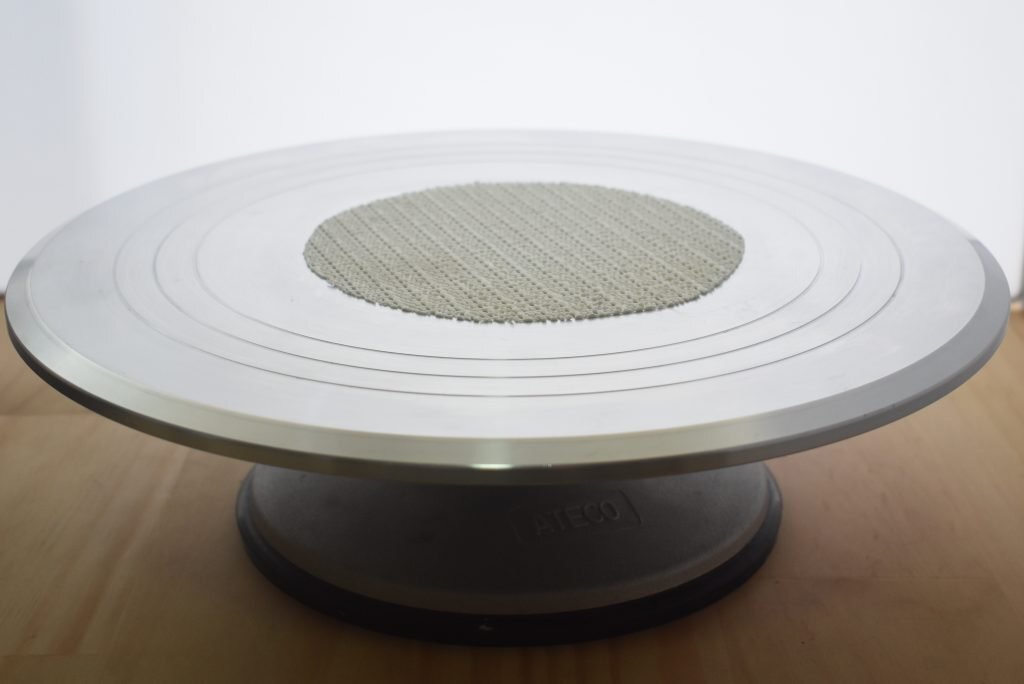
I use and recommend the Ateco 613 turntable, and the Loyal Bakeware 360 Pro here in Australia. They are very sturdy, and have ball bearing bases, which give it a smooth, even spin. As turntables go, I haven't found better, and I think they fall under MUST HAVES.
They retail for about AU$130, so not cheap, but worth it.
8" Bench Scraper
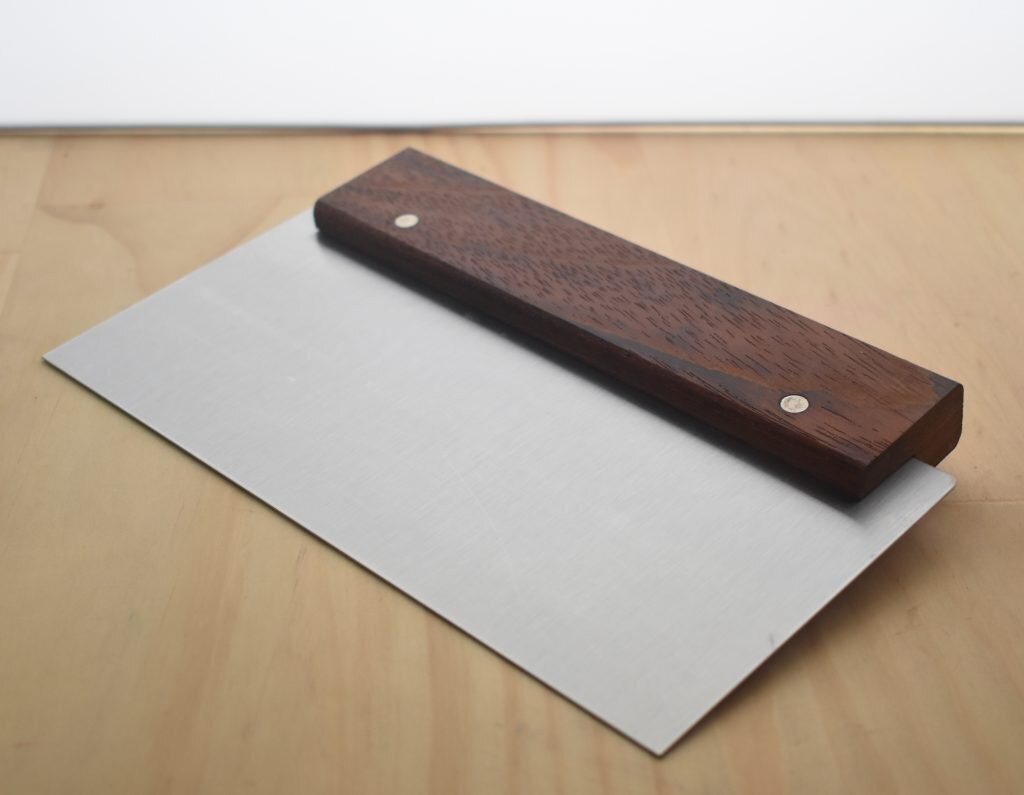
A good quality, FLAT BOTTOM EDGED scraper is a MUST. You NEED a flat edge to get perfect, straight sides.
I use and HIGHLY recommend the scrapers from Fat Girl Cakes in the US. They are hand made, excellent quality, and most importantly food safe!
Their strong metal blades are easy to heat to 'hot knife' your cakes, and the comfortable, sturdy handle keeps your hand free from icing. Kristen sells them direct, so go visit Fat Girl Cakes to get one.
Offset Spatula

You need something to get the icing on your cake. I like to use an offset spatula, but you can use whatever you feel comfortable with.
Some people like to use straight spatulas, some offset, some like to use palettes knives. As long as it lets you get the icing onto your cake, and smooth it out, it will work. The crisp finish comes from the scraper, more so than the spatula.
Frosting a Cake
Now you have the tools, pull it all together! Cut your cake into layers. How thick the layers are is up to you, personally I like to have 1 inch layers, with a small layer of Buttercream in between, not only does this give you a perfect fork sized bite, but it also helps to minimise slipping, especially in warmer months.
Step 1.

Apply a small amount of Buttercream to your presentation board and “glue” down your cake board. Apply some Buttercream to your cake board, and place your first layer on, pressing down gently, but firmly (got that awesome tip from Rosie Cake Diva!) ,loosely cover with plastic wrap, and pop them in the freezer for a few minutes to get them nice and cold. Not only will the boards stop break dancing, but it will help to keep the base of your cake nice and sturdy.

Step 2.
Fill your layers with Buttercream, and smooth out. Complete for all layers and pop it into the fridge for about 15 mins to let it get firm so we can trim it. You don’t need to cover your cake with plastic wrap, unless you don’t plan on trimming it.


Step 3.
Using a sharp knife, carefully trim the side of your cake in a downward motion. You don’t need to take off much, just about an 1/8 inch should do it. Be sure to clear away any cake scraps before you start icing your cake. They can be wrapped and frozen to use for Cake Pops, or used as bribery to keep your kids on their side of the bench!

Step 5.
Apply a thin coat of Buttercream to your cake, using only your spatula, not your bench scraper. Bench scrapers are far too brutal on loose crumbs! The purpose of this coat is to stick down any crumbs, and particularly if you are working with a very soft cake, to give it some backbone for the final coat. No one wants to chase a cake around their bench, know what I’m sayin’?
Pop it into the freezer (fridge if you are walking away for any length of time) once you have a thin layer of icing on the cake. You should easily be able to see the cake underneath, but you want to make sure that all the cake is covered, so it doesn’t dry out. If you’re keeping it in the fridge for any length of time, cover loosely in glad wrap.


Step 6.
Here’s where the magic happens.I call this the “Foundation layer”, because we want to build on it, so the purpose is strength, not beauty. This is where having that extra lip of cake board on the bottom comes in handy too.
Apply your buttercream, as thick as you want (by now those crumbs should be good and stuck) so you can always scrap it off. Keeping your scraper at a 90 DEGREE ANGLE to the board, hold your scraper COMPLETELY STILL AND STRAIGHT, and turn your cake turntable. It will look ugly, and rough, and probably make weird noises, but its cool, we are looking for STRAIGHT SIDES, NOT A PERFECT FINISH. Once you have the icing level with the cake board, pop into the freezer to chill (or fridge if you are going to finish later).

Step 7.
Now for the “Cosmetic Coat”, the coat that fills in the dents and gaps! Take care to fill in gaps and holes (almost always at the bottom!), smoothing down with your scraper, which you can now turn in towards your cake (now that you have a firm chilled cake to push against). If you need to do some more filling and patching, just pop your cake back in the fridge if it’s starting to soften, and have another go.
This is also the time to ice your cake in a layer of colour! If you want a bright red cake, but don’t want to eat all that colouring, follow the steps until the cosmetic layer, and ice you final thin layer with colour. You’ll eat less colour, mix up less coloured buttercream, use less gels (saving moolah!), and generally just make life easier for yourself. Winning.

A word about hot knifing
You may have heard the term “hot knifing”, which is basically heating up your scraper, and using the heat the melt the top layer of buttercream, smoothing it to fantastical levels of smoothness.
Why its awesome: SMOOTHNESS LIKE YOU HAVE NEVER IMAGINED
Why you should avoid it: Melting buttercream can change the colour of it, especially dark colours, so you can end up with a patchy cake. It also brings to the surface tiny bubbles just under the surface, which gets rid of them, but they present as pock marks, so you end up in a circle of fill and smooth. Hence even more uneven colour patches.
So basically, attempt in cool temperatures, and with experience, or practice your curse words.
Viva La Buttercream x