Tutorial: Mermaid Sunset Cake
Nothing says Summer like the beach, and what beach would be complete without a Mermaid! Join me for a look at some simple, yet stunning techniques to create your very own Buttercream paradise!
Beyond the Sea
Its not a beach cake without some waves right?! Using only an offset spatula, you can create the effect of water, complete with movement. What could be a flat colour, is transformed into a visual feast, not to mention its ridiculously quick to do! This technique is MORE effective the less precise you are, which makes it an absolute gem for beginners too!
For each tier, its best to start with a crumb coated, or lightly iced cake.
Bottom Tier - Wave Texture
Apply a dark shade of blue Buttercream, in a backwards and forwards motion. This is really about creating texture, so the less ‘perfect’, the better!
Repeat the process with a lighter shade of blue, gently blending the edges so that you get a subtle ombre effect.
Finish by adding a layer of white Buttercream in the same manner, and pulling the spatula off in an upwards motion, to stipple the Buttercream, and create a wave effect.


Stencilling Scales
Mermaid cakes are so in right now! The good news is, with the help of a stencil, you can create a simple yet fabulous Mermaid tail effect, without all the fuss of sculpting! This technique is also great for other textures, like animal fur and basketweave. I’m using a Scale Stencil by Cookie Countess, but any scale shaped stencil will work just fine.
Middle Tier - Mermaid Scales
Frost your cake smoothly, and apply a scale pattern Stencil to your cake (I’m using the one from Cookie Countess). You can secure your stencil by sticking clean, food only sewing pins through the stencil. I recommend using pinss with large heads, so they are easier to use, and to locate when your are done!
Apply a coat of Buttercream in the same shade as your cake, keeping it slightly thick. We are looking for definite ‘scales’, not a subtle pattern, so don’t worry if you apply the Buttercream a little heavy!
Using a clean, food only paintbrush, brush the Buttercream before it crusts, in an upwards and downwards motion. If you brush off the Buttercream, exposing the stencil, just brush it the offer way to smooth it down. You can see more about creating textures easily here.
Remove your stencil carefully, and chill the cake to firm your Buttercream. To repeat the pattern around the rest of the cake, chill until firm, and carefully overlap the stencil on an area that has been stencilled, to maintain the pattern. If it gets damaged, you can clean up stencilling with a damp paintbrush, and ‘push’ the damaged Buttercream into place.


Sunset
When it comes to choosing colours for your cake, sometimes the most obvious choice can be the least exciting. Imagine this cake with blue sea, blue Mermaid tail, and BLUE sky. Meh, pretty, but not very exciting. Lets give it real pop of colour by choosing a sunset instead! The warm tones add an extra feature of interest, and the cake itself becomes a story, more than just a series of techniques.
Top Tier - Sunset
1. Just as we did for the bottom tier, apply various shades of yellow, orange, and red Buttercream, allowing the colours to blend a little.


She Models Sea Shells
Y’all know I love to play with Buttercream, and let me tell you, the fun doesn't stop at piping tips! You can model Buttercream by kneading through cornstarch, creating a makeshift modelling medium with your left over Buttercream! No more waste! Now yes, this does give the modelled Buttercream a slightly powdery taste, but this is intended for small features, not to cover the whole cake, so use sparingly.
Sea Shells - Molded Buttercream
Knead together equal parts of Basic Buttercream, and cornstarch, to form a modelling style paste. You may need more or less, depending on your environment, and how wet your Buttercream is. Lightly dust a silicone mold, and press some Modelling Buttercream in, trimming off the excess. Pop the shells out of the mold carefully, avoiding mashing the shell.
Once dry, paint the grooves and details with a diluted mix of edible dust, and rose spirit.
You can find more info in my post “Using Buttercream in a Mold”


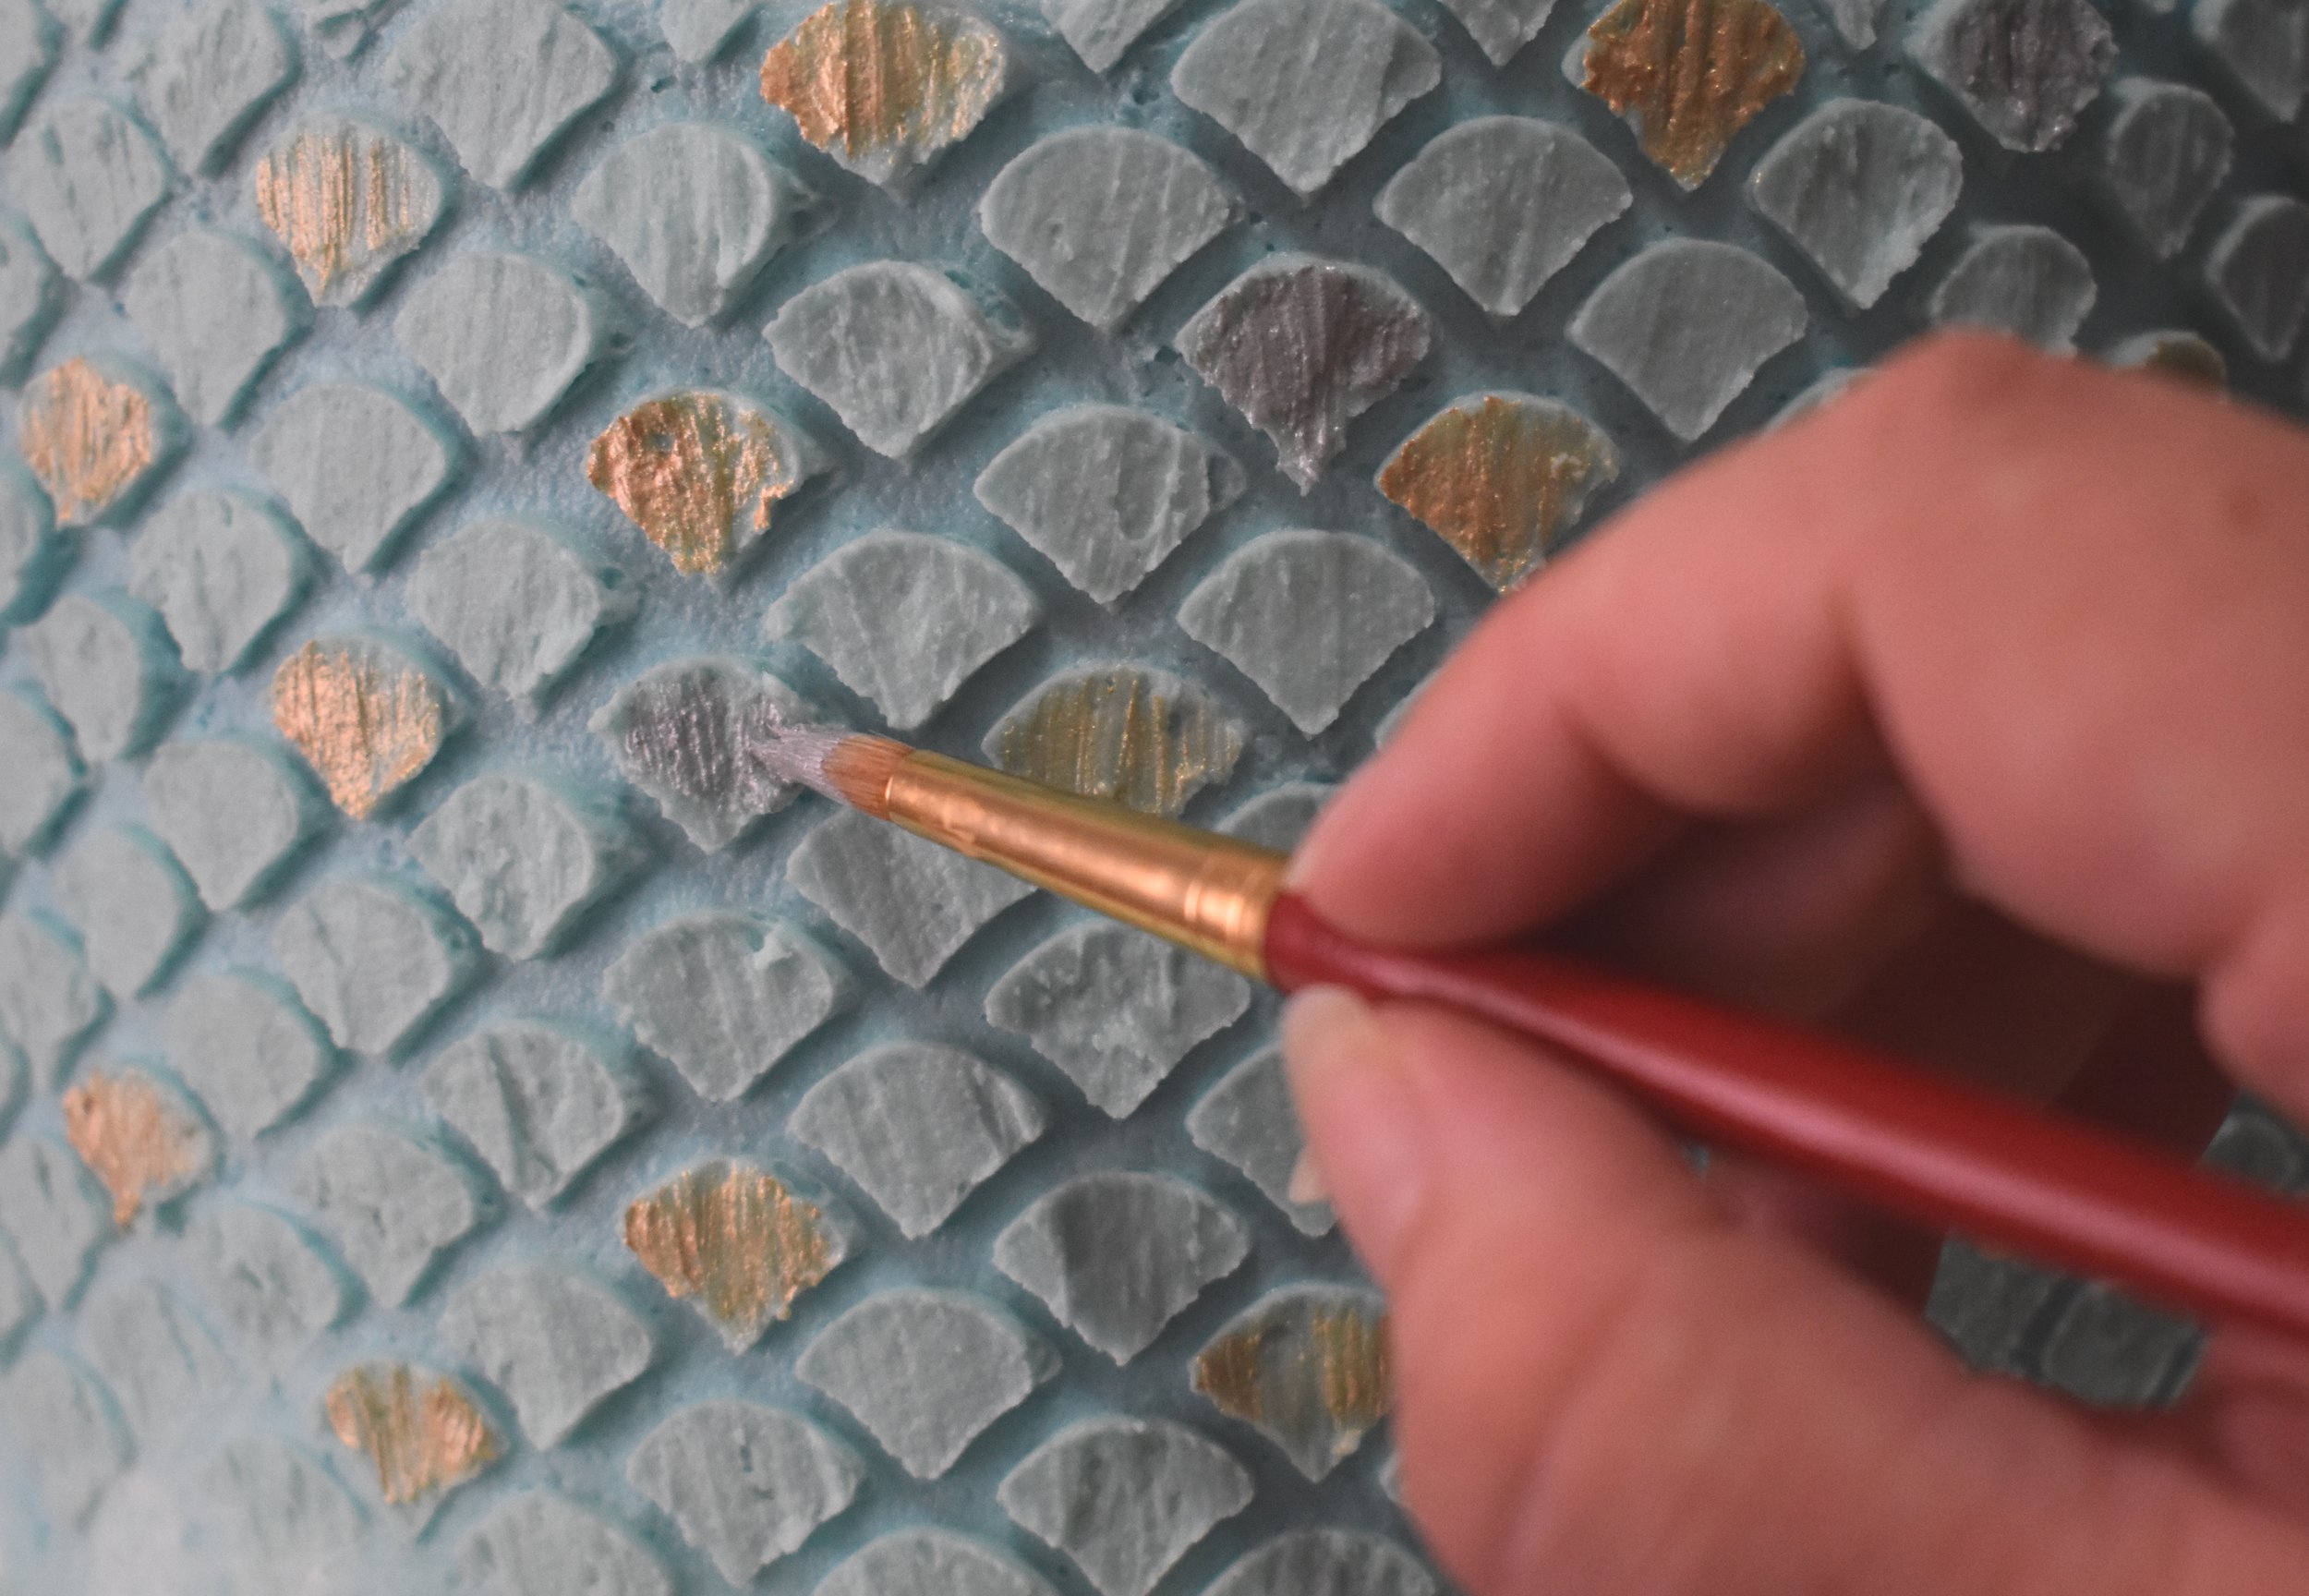
Painting Scales
By now, those adorable scales should have either crusted if the weather is in your favour, or firmed up nicely in the fridge if Summer is making itself known, so grab yourself a food safe paintbrush, and lets shimmer! A word of caution, when it comes to painting on Buttercream, or any cake surface that will be directly consumed, PLEASE use only EDIBLE dusts and paints, its just not worth your health!
Mermaid Scales - Hand Painting Buttercream
1. Using edible paint (here I’m using Metallic Edible Art Paints by Sweet Sticks), and a gentle hand, paint the crusted stencilling in alternating shades for interest.
Its best to do this either when the Buttercream has crusted, or when its chilled straight from the refrigerator. If its very warm where you are, or if your Buttercream is sweating, sit your cake in front of a table fan to help dry your paint.

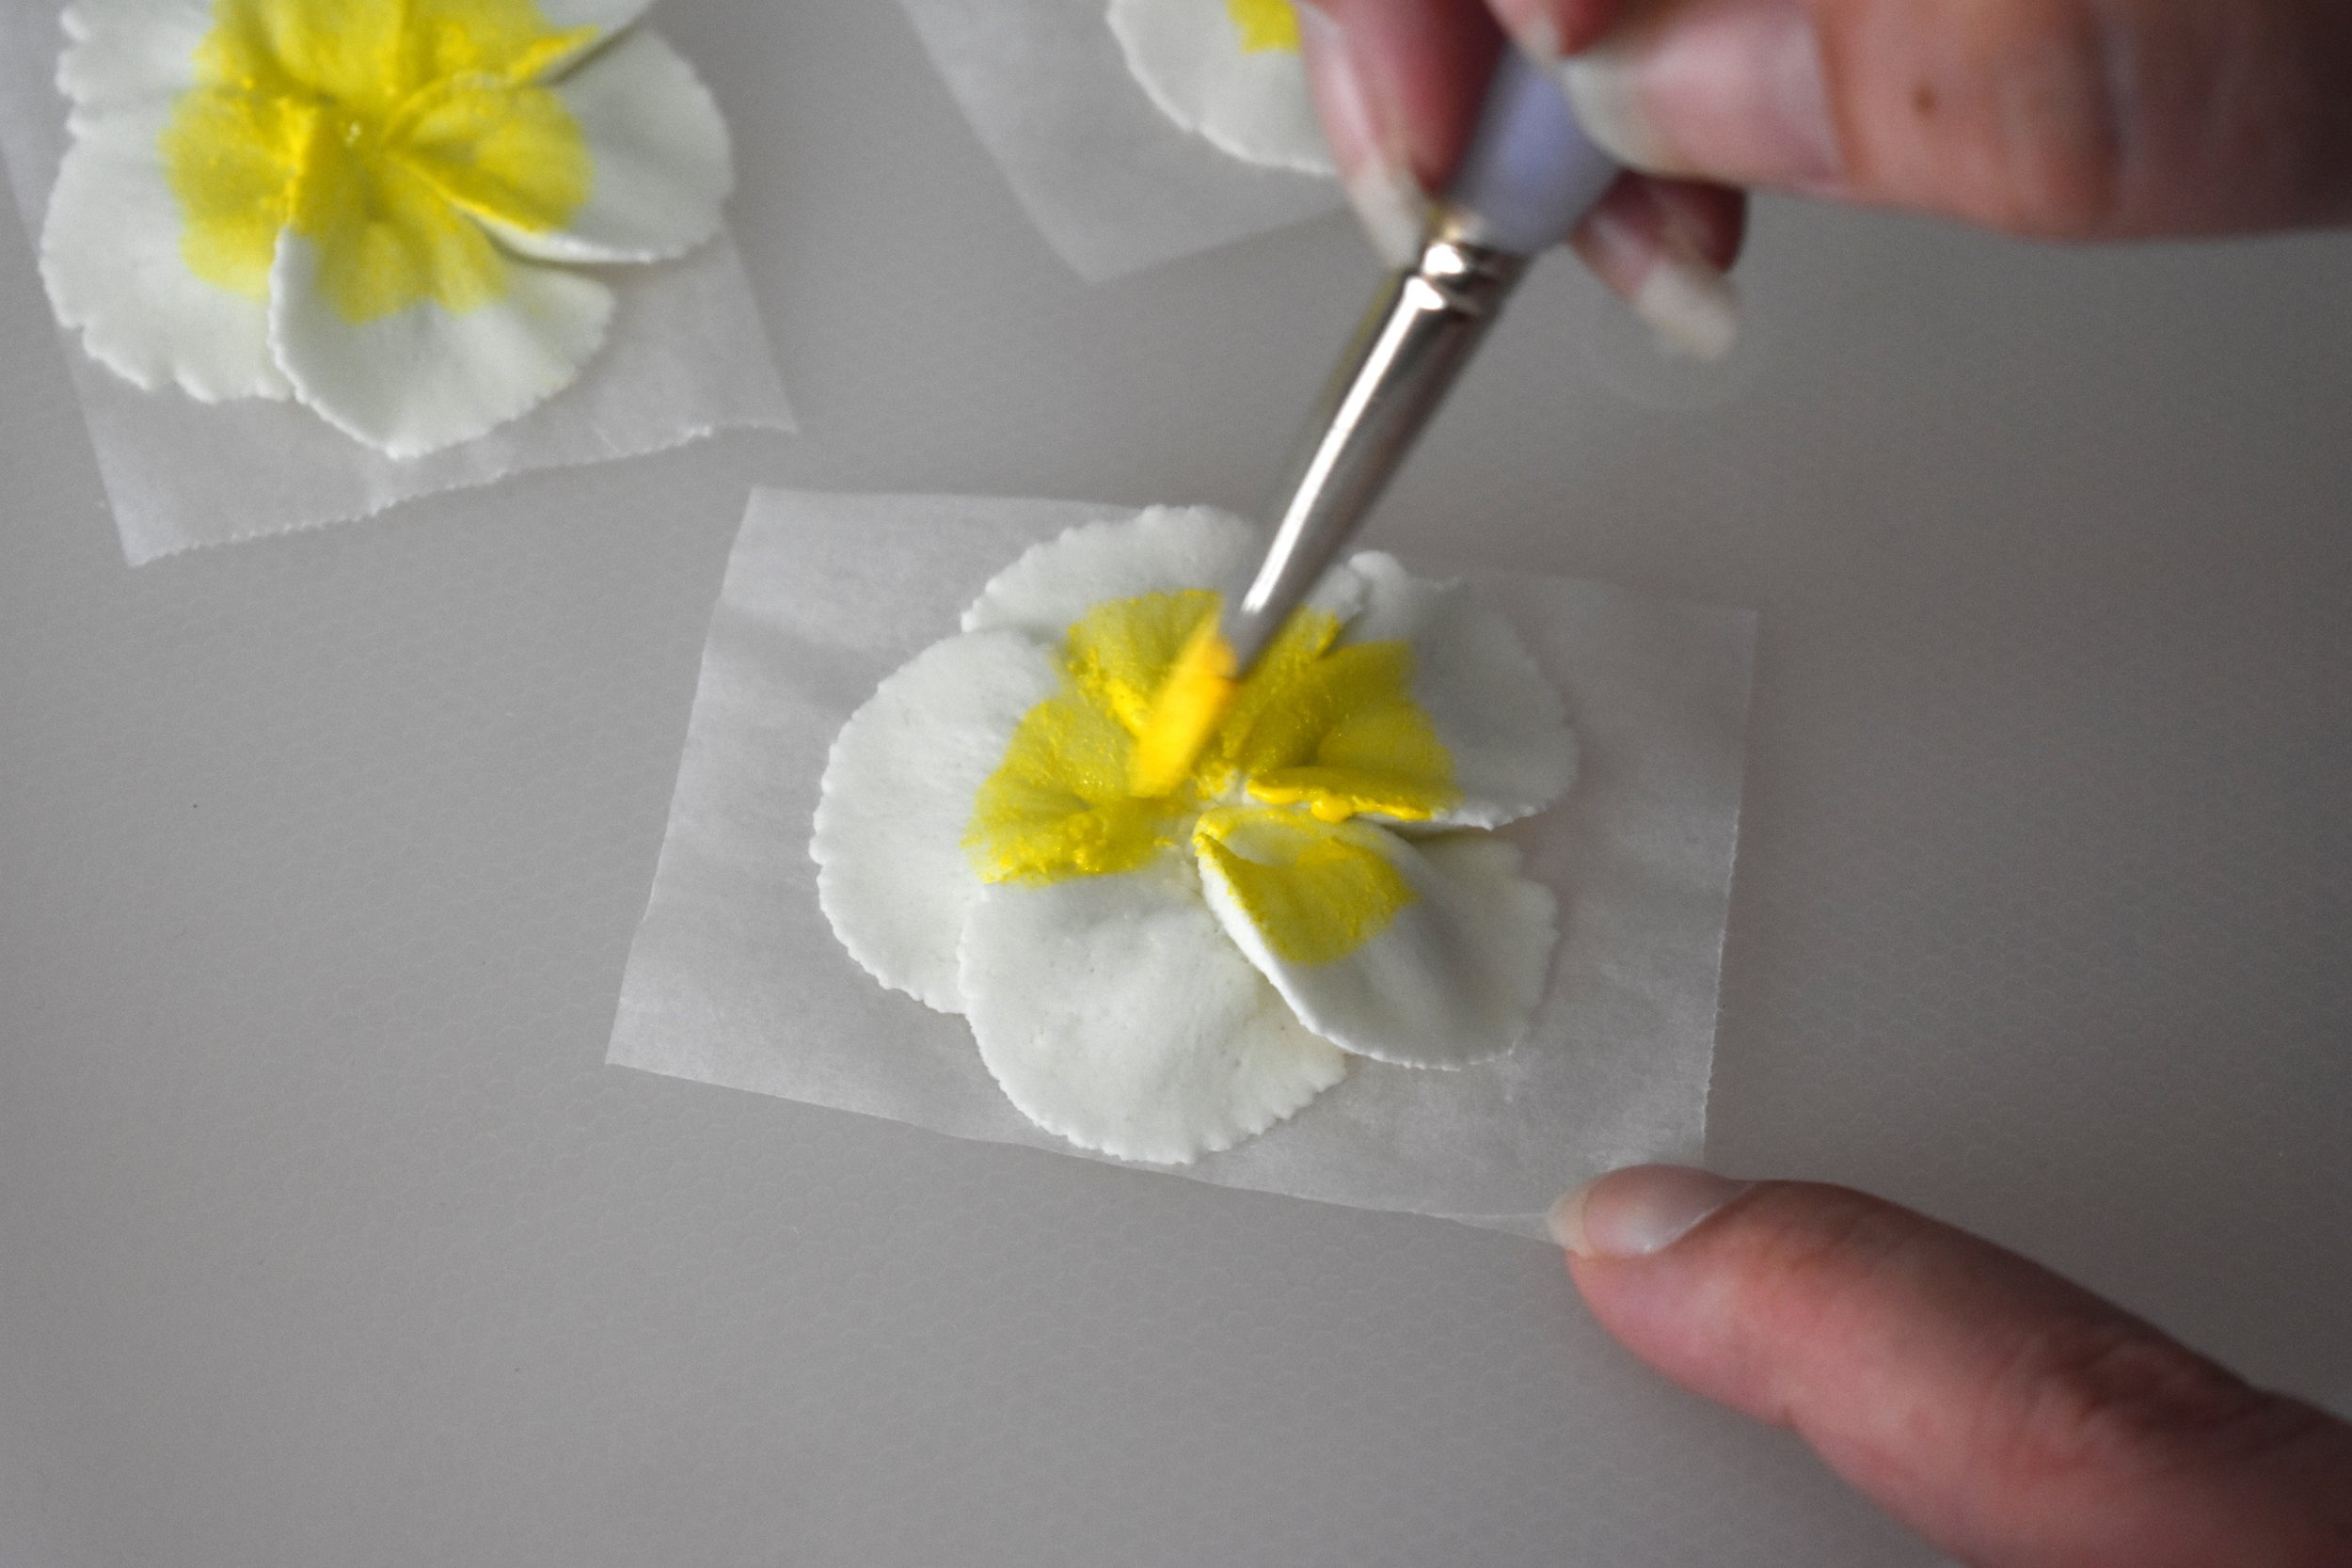
Frangipanis
I don't think there’s a more instantly recognised tropical flower than the Frangipani. It was the go to Beach Wedding Flower for about a decade, and its still going strong! This flower, while relatively simple, still packs quite a visual punch, and comes in yellows, pinks and oranges, so you can choose the colour that sets of your cake to perfection. To pipe a Frangipani, we will be using a “Basic Petal”, which is rather poorly named, as this petal trips up more students than Roses! In fact, this was the petal that I had the most trouble with when I first started, so don’t be put off if it takes a few goes to get it!
Frangipanis - Piped Buttercream Flowers
Attach a parchment square to a piping nail, and press down to get a smooth surface
Using a 127 Petal tip, pipe a basic petal, by keeping the large wedge edge of the tip to the piping nail, and turning the bag slowly. The effect of the petal is created by moving the bag
slowly, while squeezing with a firm pressure, creating a ‘fan’ effect. This seemingly simple petal stumps almost everybody!
Pipe 5 petals in all, starting each subsequent petal UNDER the previous one. This is important. If you pipe on top of the petals, your flower will not turn out! Pop into the freezer uncovered for around 15 mins before painting.
Mix together some edible dust or food gel, and some rose spirit, and using a food only paint brush, gently brush the flower from the centre out, about half way up the petal.
Allow to dry or pop back into the freezer before attaching to your cake.


Building a Paradise
Assembling your elements is the most exciting, and scary part. Up until this point, each individual piece looked good on its own, but now you have to bring it all together! The key to assembling a Buttercream cake, is to keep what you can chilled, right up until you need to use it, giving you the best working surface, or sturdiest flowers to attach. When in doubt, chill. That goes for the cake too!
I haven’t shown doweling in this process (tutorial coming soon!), but it is VERY important to dowel your cakes, whether you use wooden dowels, or straws, or some sort of premade structure, its important that the tier below doesn’t hold the weight of anything above it, or your cake will collapse!
Assembly
Using dark green Buttercream and a 127 tip, pipe your foliage directly onto your cake, using an even pressure. This tropical style leaf is achieved by piping with the wide wedge end towards you, and piping in an even, back and forward motion. Pipe first one side of the leaf, then turn the bag around so the wedge is facing you again, and pipe the other side up to meet the end of the leaf.
Attach your flowers using some Buttercream, careful to not apply too much pressure to the flower so you don't crack it. If you make the painted centre, just brush back over it with a clean paintbrush.


Et voila!
Viva La Buttercream x